Comic-Making Tutorial 001 - Computer format drawings (with Gimp)
See the video HERE
- - - - - - - { Download Gimp HERE } - - - - - - -
---
Hi folks, this video is all about how to take your drawings and get them into a format that will work well with your computer.
This could be for a comic or some other type of artwork.
So, if you have a scanner, you can scan your drawings, but this is only the beginning of the process.
The scanned image probably will not look as good as you would like, so you need to get it the way you want.
To do this you need software to manipulate the image.
Something like Photoshop to copy and paste, resize, add colours, etc. This type of software is called a graphics editor, and there are free alternatives out there.
The one I use is called theGimp, and it does everything I want it to do to create the images for my comic.
This is “open source” software, totally free, and it works on Mac, Windows and Linux.
OK, so you have your drawing and you are ready to scan. Your scanner will have various different settings.
Set it to the maximum image quality – or resolution. This might be expressed as “DPI” - dots per inch – but whatever the settings are, choose the highest resolution so you get the clearest, sharpest image.
IMAGE SIZE
In Gimp, open your scanned image.
As you can see, the scanner has captured a good quality rendering of your drawing, including pencil lines and the texture and colour of the paper, which is not pure white.
We are going to clean this up a bit to make it sharper, but first we have to think about the size of this image. It's bigger than you think!
Take a look at this little dialog box at the bottom left of the window. It says 12.5%. This is the DISPLAY size on your screen. Let's change it to 100% to see how big this image actually is...
It's jolly huge!
Much bigger than we need, but this is good because we know for sure we've got a good quality image. If it was too SMALL, resizing it would cause it to lose quality. Too big is not a problem, we just cut it down to a more manageable size.
Leaving it this large will probably cause problems for your computer because working on it will eat up lots of memory, which will slow everything down.
It will also make it more difficult to store or upload.
So, go to the top – Image, Scale Image.
Under Image Size, look at Height... It is currently 7007 pixels high. That is Ginormous!
Let's change it to 1000. Just overwrite the value you want, press Enter then click Scale.
If this is too big for your screen, try another value like 900, 800, etc.
OK, so now your image looks exactly the same, but if we check the display size box down here we see that this is now displaying at 100%.
Good, this is a manageable size that we can work with easily.
FILTERS
Now to clean up the image we use Filters.
Go to Filters, Artistic, Softglow.
There are two Softglow options here, I prefer the 'Legacy' which is an old version that they kept, but that's just because it's what I'm familiar with.
I'm going to turn the Glow Radius to zero, and the Brightness and Sharpness up to maximum.
Now on your black and white image you can see that the white is much whiter, but the black has greyed out a bit. Now we need another filter: Artistic, Cartoon.
It shows you a preview of the default settings, and as you can see your black lines are looking much blacker, but it also magnifies any imperfections, creating noise.
If I increase the Mask Radius it thickens the black lines and smooths them out, making them more solid, which is what we want. Let's turn it up to maximum. We can make the lines more black and solid by increasing 'percent black'. Turn this up to maximum as well.
CLEAN UP
Now the picture looks much better but we've still got a bit of noise to clean up. There are two ways to do this:
For a few small area you can just use the paintbrush tool.
First of all, set the colour of your paintbrush to match the background by using the COLOUR PICKER tool.
It looks like a pipette. Just click anywhere on the background. The colour box here will show you what colour you are now using.
Now select the paintbrush and just paint over the noise. You might need to adjust the size of the tool here in the tool options.
If you have a large area of noise there is a quicker way to clean it up. We are going to select the whole area by using the FREE SELECTtool, which is this lasso over here in your tool box.
Just mark out the area you want to isolate. Click Enter to complete the selection and you will see the area outlined with an animated line, the so-called “marching ants”
Now go to Edit, Fill with FG – (foreground) - colour. It does exactly what it says on the tin...
This is a very useful option. Remember you can MOVE OUTSIDE THE BOX... when selecting the area you want to isolate in this way.
Also, you don't have to worry about not quite getting the end of your line right to the beginning, when you press Enter Gimp just finds the most direct way to join them together.
Now your image is pure black lines on a pure white background.
COLOURS
Unless you're going for the minimalist look, you will probably want to add some colour.
In Gimp this is very simple. First choose your colour in the colour box here on the left.
In this rainbow stripe pick the colour you want, and then in the big box to the left you can set the lightness/darkness of that colour (vertically) and the saturation (horizontally). The “Current” stripe at the bottom shows you what colour you will be using.
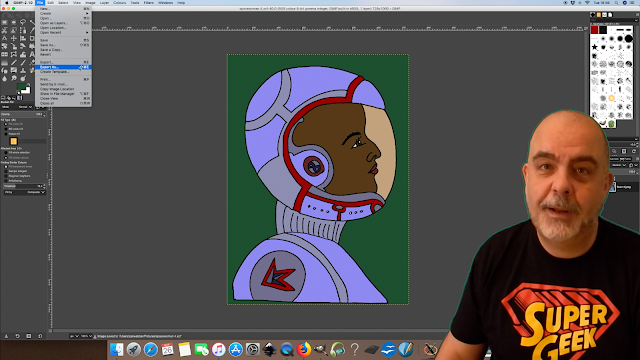
Let's choose a sort of silvery blue for the spacesuit. Now get the Bucket Fill tool and just click in the area you want to colour. It fills up the whole space up to the black borders.
Now, if your lines don't join up, the colour will break through any gaps you left. If you see this, just repair the gaps.
First, undo your mistake. Edit, Undo … or Command Z on a Mac (Control Z on a PC)
Now get your paintbrush, change colour to black and make sure your brush size is right... About 7 pixels should do it. Now you can pick another colour and fill in the separate area as you want.
If you are using a darker colour, watch out for white noise at the edge of your black borders. To fix this, turn up the Threshold on the Bucket Fill tool. Not TOO high, though, or it will break across the lines completely.
Be VERY careful using black. If you colour an area black it merges with its black border. This is not itself a problem, unless you change your mind and decide to change the colour... Then that colour runs into the black border, and every black line touching it.
You can undo anything while the image file is still open, but once you save it close it, then reopen it you won't be able to undo those changes.
You can still use a dark colour that is CLOSE to black, just make sure it has some colour in it!
Finally, make sure you give your image a background colour. Not black, which will destroy the edges, and don't leave it white.
Use a fairly dark colour, preferably very different one that you have already used in the image. Why do you need to do this? I will explain why in a later video but, for now, trust me, this is a VERY useful step.
SAVE THE FILE!
Obviously you must save your work!
With Gimp, the Save option works like most other bits of software you are used to: File, Save as, then give it a name.
It will save it as a DOT-XCF file. This is Gimp's own format, which means it does not work with other programs. If you want to do something else with your image, like post it up on the internet, you will need to create an internet-friendly version.
To do this, you have to EXPORT the file: File, export as
If you have already saved the file and given it a name, it will choose this name for the exported version. Just make sure the name is followed by DOT-JPG or DOT-PNG …
You will now have two versions of your image file. A jpg or a PNG can be uploaded to a web page.
Keep both versions. If you want to go back and change something, re-open the XCF file. When you are finished, save it and then export it again, replacing the first exported file.
That's all for now. Thanks for watching!
- - -

Comments
Post a Comment