Comic-Making Tutorial Tutorial 005 – Shading and Layers in Gimp
See the video HERE
- - - - - - -
Hi folks, today we are going to be looking at shading and layers in Gimp.
I'm starting with a black and white drawing, and I'll recap what I showed you in the first video.
We want it to be pure solid black lines on a pure, clean white background, so we use Filters:
Filters, Artistic, Softglow
I want to thicken the lines on this image, so to do that I go to Filters, Blur, Gaussian blur
... the default value is 1.5 which is fine for this
Now: Filters, Cartoon, both values up to maximum
LAYERS
If you've never worked with Layers before, you might be a little bit nervous about it, it looks horribly complex, but I'm just going to show you a couple of very simple little tricks that you can use when shading. It makes things so much easier and fun.
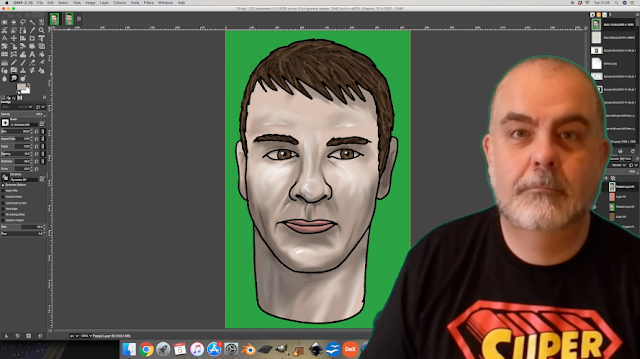
OK, so I've got the basic colours in and I want to add a few different tones... BUT … I don't want to disturb the solid black lines here. The way to DO this is to use Layers.
So I want to shade his skin. First I'll sample his skin colour use the Colour Picker Tool...
... then I copy everything here – Select, All, Edit, Copy visible
Now: Layer, New Layer .. OK for the default values...
Now look over on the right, Gimp shows you the layers you are working with.
Here is the thumbnail of the original image and ABOVE it is your NEW layer. You can see it has this checkerboard pattern, this represents total transparency.
This layer is brand new and totally empty. Basically, its invisible. But it's there!
Now I get the Paint Bucket tool and fill this layer with the skin colour that I sampled earlier.
Now: Edit, Paste As, New Layer – here is your original image, on top of the layer of skin colour.
Make sure you are on this top layer and use the Colour Select Tool. Click on the area of skin colour and Edit, Clear.
… and it looks like nothing has happened. Bur look over here – there is a blank space on your top layer where that colour has been removed.
What you are seeing is the skin colour on the layer below.
Let's delete the bottom layer now, we don't need it.
OK, so why I have done this? Let me show you. I want to add some darker tones to this guy's skin, and I want to do it WITHOUT disturbing the original black lines.
So, I go to the colour box and darken the colour. I select the paintbrush tool and I select the LOWER layer, which is just the skin colour. Now when I start painting you can see that the top layer with black lines, brown hair, the green background, his lips, are all totally unaffected.
I can do whatever I like on the bottom layer, it won't affect my original outlines, which remain perfectly superimposed on top of whatever I do underneath.
Great, so let's do some shading. I'll give my paintbrush a fuzzy edge and I want it dark but not too heavy so I'm turning the opacity down.
Now, this is important, CHECK that you are on the correct layer before you start! Otherwise you'll waste a lot of time and work. So check that first!
Now I'll add some highlights, change the colour to something much lighter and increase the opacity.
Now I'm going to add more shadows using a completely different method. I want to select large areas so I get the Lassoo here and create the area I want then go to Colours, Brightness/Contrast and turn down the Brightness.
This method allows me to mark a shadowed area with a precise border, like under the eyebrows, around the bottom of the nose, etc...
Ok, it looks a bit weird, and harsh... but now let's use the SMUDGE tool here and start to soften these areas. It starts to look a bit more natural.
To blur a larger area, increase the size of the brush.
Hair Texture
OK, that's the skin, now let's do the hair.
Same method, first: sample the hair colour
Now Select, All, Edit, Copy Visible – this copies everything in your image that you can see.
Next: Layer, New Layer, OK … and fill it with the colour you sampled.
Now you can see you have four layers, and the top layer is a copy of what you have so far.
Once again, we go to the top layer and select the same colour again and Edit, Clear to delete it.
Now go to the layer we want to WORK on.... I'm going to texture the hair, and it's a fairly simple process.
First darken the colour. Now set the paintbrush fairly thin, about 7 pixels is about right. Opacity at maximum.
This character has pretty ordinary hair, short and wavy, so I'll do some fairly short strokes.
Now set the colour lighter than the original shade and I'll do the same again, but not so much, these are just highlights... Having three shades of the same colour gives it a bit of depth.
Now I'm going to SMUDGE these lines. Set the width of the smudge tool a little larger than the original strokes. Stroke over these lines in the SAME DIRECTION that they are pointing. Go WITH the grain, not AGAINST the grain!
Finishing Touches
Now for the EYES... same process again.
The colour select tool has picked up similar shades in the rest of the image, so let's use the Fuzzy select tool to just pick the individual areas we want to clear.
I'm just adding a little variation in colour to make them look a little more realistic.
Same for the lips. Here I'll add a little shadow as well as the darker tone, and smudge it all just a little.
Opaque white highlights here for the reflections in the eyes, also highlights on the parts of the face that catch the light most, the nose, cheekbones, the forehead... Smudge them but NOT the eyes.
At this point be careful because you are smudging the whole image, which includes the black outlines.
I'm going to make a colour correction here. For the whites of the eyes, I don't want them to be ABSOLUTE white, I'm going to pick a slightly grey-ish, OFF white... that will make the highlights stand out more. If his teeth were showing I would use the same colour there as well.
Just a few more little shadows for depth....
And I think that's enough!
Thanks for watching!


Comments
Post a Comment